In my real, daytime job I have been working with object-oriented languages like Java, C++, C# and python for several years. On the contrary, hobby stuff with microcontrollers has always been pure C or assembly. Although I understand perfectly resource constraints of the embedded world, the limits are not totally as strict as they used to be: modern microcontrollers tend to have more and more memory and processing power. Because I also very firmly believe that object-oriented design really rules when creating complex systems, I decided to do a little expermenting what it would mean in Pico]OS embedded world. Continue reading “Object-oriented approach to embedded programming (with C++)”
Manuals uploaded to github
I recently uploaded doxygen-generated manuals of some pico]OS -related libraries into github pages:
- pico]OS: Standard documentation with latest updates
- picoos-micro: Micro-layer documentation (misc stuff + fat)
- picoos-ow: Maxim/Dallas support for pico]OS
- picoos-net: IPv4 & IPv6, socket layer and ethernet drivers for pico]OS
Pico]OS IPv6
As it seems that everyone’s sensor nodes have started using IPv6 I wanted mine to have it too. The sensor node in question is the one I built for storage room temperature monitoring some time ago. Current system uses pico]OS and uIP network stack. The uIP stack was taken from Contiki OS, which is described as the operating system for “Internet of Things”. The original uIP stack supports only IPv4, but Contiki has added IPv6 support.
However, it turned out that extracting IPv6 support from Contiki was not as easy as with the original IPv4 version. IPv6 code contained dependencies to Contiki timers (three different ones), clock module, list and memory block management functions. It turned out that most of these functions were usable as-is with pico]OS also, only etimer code needed more changes to use posTimer* functions.
To minimize differences to official Contiki code I decided to mimic the original function names that were related to packet flow. So now picoos-net -library contains tcpip_input, tcpip_output and tcpip_ipv6_output also. Device driver layer integrates to network stack through these functions.
I kept my original idea about aligning IP headers on 32-bit boundaries to allow efficient code on ARM-systems, as it allows also compiling with -Wcast-align to detect alignment errors (which cause odd effects on arm7tdmi cpus).
I did most of debugging with pico]OS unix port, which allowed debugging and testing without need to load code to microcontroller all the time.
Today I loaded the code to my Olimex LPC-E2129 board. At first system looked pretty dead, but it turned out that I had to modify the ethernet driver to accept incoming multicast packets also, otherwise icmp6 doesn’t really work at all. But after that change I was able to ping the board:
PING6(56=40+8+8 bytes) fd7b:ede2:27c7:3c:20c:29ff:fef8:d912 –> fd7b:ede2:27c7:3c:2bd:3bff:fe33:4d5
16 bytes from fd7b:ede2:27c7:3c:2bd:3bff:fe33:4d5, icmp_seq=0 hlim=64 time=8.111 ms
16 bytes from fd7b:ede2:27c7:3c:2bd:3bff:fe33:4d5, icmp_seq=1 hlim=64 time=6.177 ms
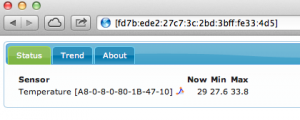
Browsing the Web Server also works nice:
It seems that Contiki uIP stack keeps evolving a lot currently, there have been a lot of changes during my port which I’ll have to merge into my version in the future. But I think that I’ll wait until next Contiki release before doing that.
Code is now available at GitHub.
LPCXpresso IDE & Pico]OS
LPCXpresso is a low-cost development platform for NXP’s Arm-based microcontrollers. In addition to hardware boards it includes a quite nice eclipse-based IDE, which seems to use gcc as compiler. I really haven’t bothered very much about it myself until another hobbyist asked me about tips for running Pico]OS -based applications in that environment for his LPC1769 board.
I myself have been using Eclipse CDT (3.8 currently) and Yagarto (arm gcc toolchain for windows environment). I don’t have a LPC1769 board myself, but instead I have an Olimex LPC-1343 board I have used to test cortex-m port of Pico]OS. Both are cortex-m3 boards so they should be suitable for testing basic architecture functionality. Continue reading “LPCXpresso IDE & Pico]OS”
Wireless KWh meter
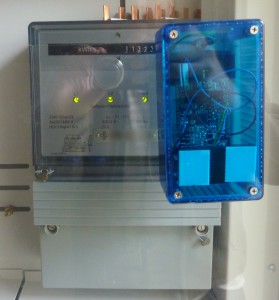
After creating wireless compost monitor I was wondering what else could be done with the same card. I then saw a commercial about a gadget which displays house electricity usage in real time. The idea of the device is to help saving of energy. The gadget had a small box that apparently monitors how frequently the led on KWH-meter blinks (on our meter, it blinks once per 1 Wh) and sends that information to indoor visual display unit, which converts it into kilowatts.

The commercial gadget looks really nice, but of course I had to make my own. The MOD-CCRF card is just perfect for system like this. I just added a phototransistor with pull-up resistor to keep on eye on the blinking led. After checking that my “eye” was really able to see the blinking led I added some code to existing wireless monitor application to calculate house electrical power from blink count. The monitor unit sends the data then to same wireless access point as the compost unit for saving results in database.

Our KWH meter is in a small ‘closet’ which has a transparent plastic door. By attaching velcro strips to the door and back of the monitor box I was able to position the unit exactly over the blinking led.
I also created a simple chart to monitor results (last trend at bottom of page).
Source code is available at Github in sensor-node project.


