

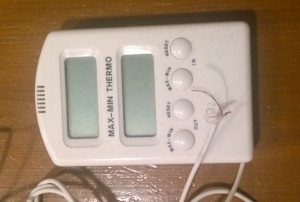
This project started when our cat decided that playing with our thermometer is a good idea. Obviously, the thing looks enough like mouse with tail, at least when looked with cat’s eyes. The play with it ended very quickly and result was broken cable between display and sensor.The easiest way to fix this would obviously be buying a new 10€ device from local hardware store. But as I already have a weather station running on top of garage roof I started thinking that it would be nice just to display temperature from there.
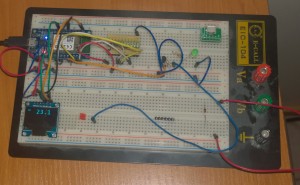
To start experimenting, I ordered one WifiMCU (EMW3165 + RS232-USB converter) and 0.96″ OLED display from ebay. For measuring inside room temperature DS18B20 sensor is the easiest solution and I already had those in my part box.
I’m not using the original firmware of WifiMCU (which provides LUA language support). Instead, this project is plain old C.
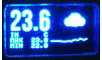
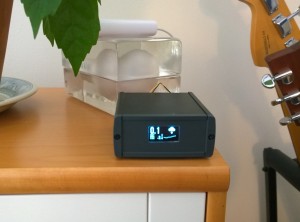
To manage the OLED display, I used a very nice uGUI library. It is very easy to integrate to display hardware and provides a lot of functionality for building user interface. The resolution of the display is only 128×64 pixels, but I managed to squeeze in current temperature value with big font, min & max values with small font and also a small trendline of temperature history. As there was still some room left, I added a symbol that show weather forecast for now+8 hours.
The weather symbol is displayed by use of special font, which was created from svg files provided by the Open Data project of Finnish Meteorological Institute. After converting those to TTF font it was converted into uGUI compatible format by ttf2ugui utility.
Weather station data is taken from my house MQTT server as it is already published there for other purposes. The same server provides also measurement about house electricity usage, so I ended adding that to display too.
 I’m planning to use same firmware as basis for other measurement tasks also, so I built some configurability into it. When the system starts up first time, it can be configured from RS232 console or telnet connection to access point provided by EMW3165 module.
Following commands are used to get things up and running:
$ telnet 192.168.0.1
Connected to 192.168.0.1.
Escape character is '^]'.
Pico]OS 1.0.4a
esh> sta ap_name ap_password
esh> mqtt --server=mqtt.stonepile.fi
esh> wr
esh> exit
sta associates system with access point and starts dhcp client to obtain IPv4 address. IPv6 address is also autoconfigured (if enabled). mqtt tells which mqtt server is to be used for obtaining data. wr writes current configuration into flash memory.
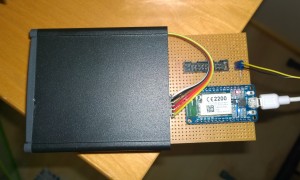
EMW3165 module has SPI flash chip, which is used for OTA upgrades in standard Wiced SDK-based firmware. I’m using the chip for SPIFFS filesystem instead, so I can store Wifi firmware and configuration information there.
I was a little bit worried if the Wifi connection is going to work when the system is in aluminum enclosure, but it seems to be OK, as the front and back panels of the box are plastic.
All code is at github.
Father of three 🙂
{ Electronics | Music | Computer | Motorbike } hobbyist.
Factory IT professional.
FreeBSD since day one.


